I've done this a few times now, and I'm currently trying to help make it easier for developers I work with to move back to Windows from the increasingly irrelevant Mac platform.
All OS politics aside, hopefully this helps you install Windows 10 and set it up to be a nice interface for doing technical work. The target audience is Mac and Unix users.
Over the past few years I have written up some other posts, and I'll link to them here and update them as needed based on my most recent experience.
1) Install Windows 10
Before you do anything, you need to install Windows 10 as a fresh install. I'll let How to Geek tell you how to do that, their instructions worked perfectly for me.
How to do a Clean Install of Windows 10, the Easy Way
1.A) Update Graphics Drivers
The very first thing you should do after installing Windows 10 is update your graphics drivers.
I use nVidia cards, and Windows does install some basic drivers that support it, but they are not updated and they are missing many features from the official nVidia drivers. (I'm a gamer, I do game things, I need official drivers).
1.B) Fix your username and home directory
[EDIT] There is actually an option to "skip this" when it asks for your Windows Live login on a fresh install. If you click that, you can type the name of the local account you want there. If you missed it, follow the steps below to fix your username to something you want.
One of the more annoying things about Windows 10 installs is that it is so user friendly.
It's so user friendly, that they do not give you the option to set up what username you want on the system, or what home directory you want to use.
For normal people this doesn't matter, but for tech people, especially people who need their name to be consistent across a network that includes Mac and/or Unix machines, this will not do.
For example Windows decided that my username was "rossd" and my home directory was going to be "C:\Users\rossd" -- but I am known as "ross" on every computer I own, and I expect to be known as "ross" on Windows 10 as well.
Here is a great post about how to fix this problem.
Read the reply from youssoufsawadogo on August 10, 2015. He goes into detail about how to fix this.
After that one, you also need to read youssoufsawadogo's second reply on August 13, 2015 which include the final steps to complete the fix.
TL;DR
- Switch to a local account
- This lets you choose your new username (I chose "ross")
- Edit registry to change your home directory path (I chose "C:\Users\ross")
- Reboot
- Manually rename/move your old home directory folder to the new place where you want it to be (I moved the unwanted "C:\Users\rossd" to the new "C:\Users\ross")
- Reboot
- Switch back to your Microsoft Live account
And the end of this ordeal:
My username = ross
My home dir = C:\Users\ross
1.C) Set your computer's hostname
WikiHow has a nice post:
How to Change Your Computer's Name (Host Name) on a Windows PC
1.D) Install Anti-Virus software
Install whatever anti-virus software you or your organization prefers. We're about to download stuff from the Intervirusnettrojanwebs!
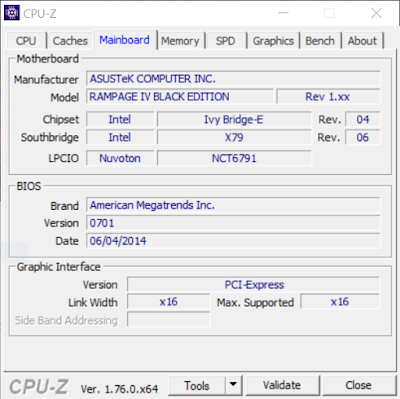
1.E) Install your motherboard manufacturer's drivers
To find out what kind of motherboard you have:
- Install CPU-Z
- Run it
- On the "Mainboard" tab, note your Motherboard Manufacturer and Model
- Search the Internet for drivers specific to your system
- Only install drivers from sources you trust, and get only the latest versions of them
For example, mine is an ASUS Rampage IV Black Edition, and a quick search leads me to the
ASUS drivers page for this specific model of motherboard.
You will likely have a different motherboard, perhaps even a different manufacturer. Make sure you install the right drivers for your hardware.
2) Install Basic Applications
Now that Windows is up, your user account is set up exactly how you want it and your video card is pumping out your sweet 4K or better resolution, you are ready to do stuff.
Almost.
2.A) Install Chrome
Install
Chrome, then make sure you sign into it to sync all of your previous settings, bookmarks, etc.
Especially if you are coming from Mac, we don't use Safari on this side of the tracks. It, like all other Apple software, totally sucks unless you're on a Mac.
2.B) Install Sublime Text 3
I'm not sure why Microsoft refuses to make a text editor that isn't crap.
But that's OK, we have
Sublime Text 3. Currently it's my favorite, and it works on Windows text files, Mac text files, Unix text files. If you have a text file, this will edit it.
Make sure you
Add to Explorer Context Menu when you install, it gives you a cool right-click "Edit with Sublime Text" option on all of your files, which will save you a lot of time if you like to edit files.
2.C) Install Dropbox
If you aren't using
Dropbox, I'm not sure what century you are living in.
iCloud only works if you're on a Mac (surprise!).
Google Drive actually works pretty well no matter where you are, unless you're on an iShit device that makes it work poorly and which most Apple apps refuse to integrate with.
So Dropbox is the best option for cloud storage IMO, it has the widest range of support on all platforms from what I have seen. (My info could be outdated, but I still use it anyway).
2.D) Install mSecure password manager
mSecure is a must-have app. But not the piece of shit they have in the Windows store. Make sure you get the desktop version I linked.
If you know all of your passwords, then they are not secure enough. Even worse, if you don't have very many passwords, then all it takes is for 1 site you visit to get hacked and you are completely screwed.
I have memberships to 100s of forums, web sites, etc. I use a completely unique, completely random password for each one.
As it is impossible to remember all of those, I use a password manager that keeps an encrypted database in the cloud (on Dropbox) which is easily shared across all of my devices.
This is optional, but I think it is foolish at this point in time to not use a good encrypted password manager, IMO you are just asking for trouble.
There are other good password managers, but mSecure works for all of my devices: Win 10 desktop/laptop, Mac laptop, Android phone/tablet, iPhone, iPad. When I started using it a few years ago, it was the best app that supported every device.
2.E) Install Skype
Skype is broken quite a lot (come on guys!) but it's still very useful if you actually need to talk to people.
Since Facetime only works on Mac (typical stupid Apple) and Google Hangouts is virtually impossible to actually use (please guys, UI shouldn't be an afterthought), Skype it is.
2.F) Install 7-Zip
7-Zip is the best Windows zip program I have found, and many people are starting to use *.7z files instead of zip files.
I recommend that you install this to a custom location, because it is helpful (and required by some applications) to have 7zip.exe in your path.
I installed it to C:\tools\7zip
I also recommend allowing it to install the Explorer shell extension. This means you will get a nice right-click menu option allowing you quick access to some 7-zip features without having to actually open the app up.
2.F.A) Add 7-Zip to your System Environment PATH
- Windows key
- Type "system env" and select the "Edit the system environment variables" option
- Click the "Environment Variables..." button
- In the System variables box, click the "Path" variable, then click the "Edit..." button
- Click the "New" button
- Enter C:\tools\7zip as the new path
- Click OK
- Click OK to close Environment Variables
- Click OK to close System Properties
3) Set up Unix-live Dev Workstation
Now that you aren't feeling so naked, it's time to install some work tools.
Refer to my previous post:


